Welcome to the guide for the Vinyl Works Pool Ladder‚ a durable and safe entry system designed for above-ground pools. This guide provides essential instructions for proper installation‚ use‚ and maintenance to ensure a secure and enjoyable swimming experience.
1.1 Overview of Vinyl Works Pool Ladder
The Vinyl Works Pool Ladder is a durable and safe entry system designed for above-ground pools. It features sturdy construction‚ slip-resistant steps‚ and easy-to-grip handrails for secure access. The ladder is designed to withstand harsh outdoor conditions and provides reliable performance. Its sleek design complements various pool styles while ensuring user safety. Proper installation and maintenance are essential to maximize its longevity and functionality. This guide will walk you through the necessary steps to install‚ maintain‚ and use the ladder safely.
1.2 Importance of Following Manufacturer Instructions
Following the manufacturer’s instructions is crucial for the safe and proper installation of the Vinyl Works Pool Ladder. Deviating from the guidelines can lead to instability‚ safety hazards‚ or damage to the ladder. Ensure all parts are assembled correctly and secured to the pool deck as specified. Proper installation ensures the ladder’s durability and reliability‚ protecting users from potential accidents. Always refer to the provided manual for precise steps and safety precautions to guarantee a secure swimming environment.
Safety Precautions and Preparation
Always follow safety guidelines to prevent accidents. Ensure the area is clear of obstacles and wear protective gear during installation. Proper preparation ensures a secure setup.
2.1 General Safety Guidelines
Always prioritize safety to minimize risks. Ensure the pool area is clear of obstacles and wear protective gear during installation. Regularly inspect the ladder for damage or wear. Avoid using the ladder if it is unstable or damaged. Follow the manufacturer’s instructions precisely to ensure proper assembly and installation. Supervise children when the ladder is in use‚ and never allow unsupervised access to the pool. Proper preparation and adherence to safety protocols are crucial for a secure and enjoyable swimming experience.

2.2 Pre-Installation Checklist
Before installation‚ review the manufacturer’s instructions thoroughly. Gather all tools and materials‚ ensuring no parts are damaged or missing. Inspect the pool deck for levelness and stability. Clean the area of debris and obstructions. Verify that all hardware and bolts are included and compatible. Ensure the ladder’s dimensions match your pool’s specifications. Double-check the warranty and contact Vinyl Works Canada for any pre-installation queries. Proper preparation ensures a smooth and safe installation process. Follow the checklist to avoid delays or complications.
Tools and Materials Needed
Required tools include a wrench‚ screwdriver‚ and drill. Materials needed are bolts‚ screws‚ and lubricant. Ensure all parts are included in the package or purchased separately.
3.1 List of Required Tools
To assemble and install the Vinyl Works Pool Ladder‚ you will need a wrench‚ screwdriver‚ and drill. Additional tools may include a ladder‚ measuring tape‚ and lubricant for moving parts. Ensure all tools are in good condition to avoid installation issues. Refer to the manufacturer’s list for specific requirements. Proper tools are essential for a safe and secure installation process. Always follow the instructions provided with your pool ladder kit for the best results.
3.2 Additional Materials for Installation
For a successful installation‚ consider additional materials like step pads or ladder pads for extra safety. Ensure you have all necessary hardware‚ such as bolts and screws‚ which may not be included. Gloves and a silicone spray or lubricant can aid in handling and maintaining moving parts. Always check the manufacturer’s list for specific requirements to ensure a secure and durable setup.
Assembly Instructions
Begin by aligning all parts according to the manufacturer’s guide. Secure each component with the provided hardware‚ ensuring stability and proper fit. Refer to the instructions for precise assembly steps.
4.1 Identifying and Organizing Parts

Start by carefully unpacking all components and organizing them according to the manufacturer’s guide. Identify the ladder sections‚ handrails‚ steps‚ and support legs. Ensure all hardware‚ such as bolts and screws‚ is accounted for. Refer to the provided diagram for clarity. Properly organizing parts ensures a smooth assembly process and prevents missing or misplaced items. Double-check the Model 2006IN parts list to confirm everything is included before proceeding.
4.2 Step-by-Step Assembly Process
Begin by attaching the handrails to the ladder sections using the provided bolts and screws. Ensure all connections are secure. Next‚ connect the steps to the ladder frame‚ aligning them properly. Attach the support legs to the base of the ladder for stability. Tighten all hardware firmly. Refer to the diagram for correct assembly order. Once assembled‚ double-check all parts to ensure they are securely fastened. Follow the manufacturer’s instructions precisely to guarantee safety and durability.
Installation Guidelines
Position the ladder in the pool‚ ensuring it’s stable and level. Secure it firmly to the deck using the provided hardware‚ following manufacturer guidelines safely.
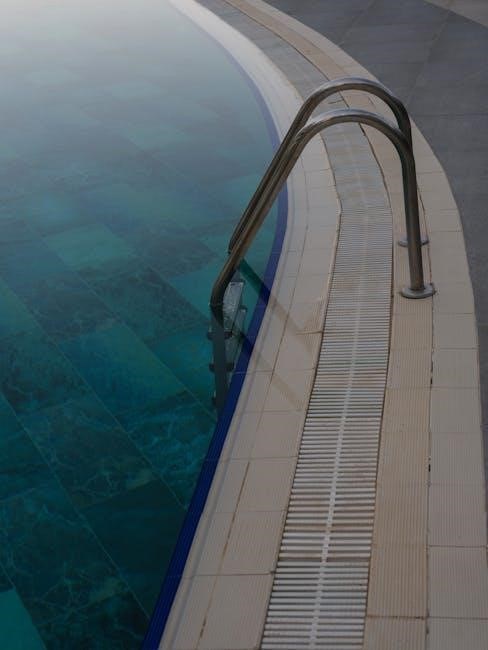
5.1 Positioning the Ladder in the Pool
Place the ladder in the pool‚ ensuring it is stable and level. Check that the base plates are securely positioned on the pool floor. Align the ladder with the deck for proper entry and exit. Ensure the ladder is centered and evenly spaced for optimal performance. Verify that the ladder does not obstruct the pool area and is accessible for all users. Follow the manufacturer’s instructions for exact positioning to ensure safety and functionality.
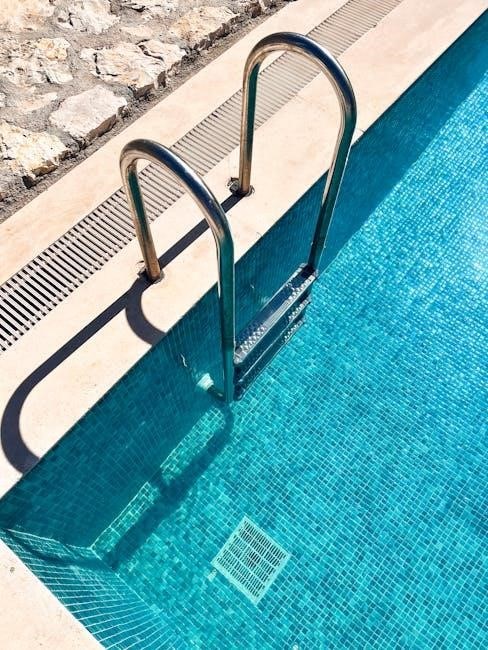
5.2 Securing the Ladder to the Pool Deck
Attach the ladder to the pool deck using the provided bolts and brackets. Ensure the ladder is tightly secured to prevent shifting. Follow the manufacturer’s instructions for proper alignment and tightening. Double-check the stability of the ladder by gently rocking it. Make sure all bolts are tightened evenly to maintain balance. For added safety‚ ensure the ladder is parallel to the pool wall and evenly spaced from the edge. Refer to the manual for specific torque settings and attachment points to ensure a secure installation.

Maintenance and Care
Regularly clean the ladder to remove dirt‚ mildew‚ or algae. Inspect all bolts and connections for tightness. Follow manufacturer guidelines for cleaning and maintenance to ensure durability and safety.
6.1 Cleaning the Ladder
Regular cleaning is essential for maintaining the ladder’s durability and safety. Use a soft-bristle brush or cloth with mild detergent to remove dirt and algae. Avoid abrasive cleaners or harsh chemicals that may damage the vinyl. Rinse thoroughly with a hose to ensure no residue remains. For stubborn stains‚ mix baking soda and water to form a paste‚ apply it to the area‚ and scrub gently before rinsing. Regular cleaning prevents grime buildup and ensures a safe‚ slip-resistant surface for users.
6.2 Regular Inspections for Safety
Perform regular inspections to ensure the ladder remains safe and functional. Check for cracks‚ dents‚ or loose parts that may compromise stability. Inspect the vinyl finish for signs of wear or fading. Ensure all bolts and screws are securely tightened. Rinse the ladder regularly to prevent mineral buildup. Examine the steps and handrails for damage or corrosion. Address any issues promptly to maintain the ladder’s integrity and prevent potential hazards. Regular inspections help ensure a safe and durable swimming experience for years to come.

Troubleshooting Common Issues
Address stability problems by tightening loose parts. For damaged components‚ refer to repair guides or contact Vinyl Works Canada for assistance at 877-VINYL WK.
7.1 Addressing Stability Problems
If the ladder feels unstable‚ check for loose connections. Tighten all bolts and screws according to manufacturer instructions. Ensure the ladder is properly anchored to the pool deck. If instability persists‚ inspect for damage or wear. Contact Vinyl Works Canada at 877-VINYL WK for assistance or replacement parts. Always follow safety guidelines to prevent accidents.

7.2 Repairing Damaged Parts
Inspect the ladder for any damaged or worn-out components. Replace broken parts immediately to ensure safety. Use only manufacturer-approved replacement parts. Contact Vinyl Works Canada at 877-VINYL WK for assistance. Tighten any loose connections and apply lubricant to moving parts if necessary. Avoid using the ladder until repairs are complete. Regular maintenance can prevent further damage. Always follow the manufacturer’s guidelines for repairs to maintain stability and safety.
Congratulations! You’ve successfully installed and maintained your Vinyl Works Pool Ladder. Always follow safety guidelines for secure usage. For further assistance‚ contact Vinyl Works Canada at 877-VINYL WK.
8.1 Final Safety Reminders
Always follow manufacturer guidelines for safe usage. Ensure regular inspections of the ladder and proper maintenance. Supervise children and avoid swimming alone. Adhere to weight limits and avoid sharp objects that may damage the ladder. For additional support‚ contact Vinyl Works Canada at 877-VINYL WK or visit their website.
- Never modify the ladder beyond manufacturer recommendations.
- Ensure stable installation to prevent accidents.
- Review safety guidelines periodically for awareness.
8.2 Manufacturer Contact Information
For inquiries‚ support‚ or additional information‚ contact Vinyl Works Canada at 877-VINYL WK. Visit their official website at www.vinylworkscanada.com or email them at office@vinylworkscanada.com. Their office is located at PO Box 96‚ Port Colborne‚ Ontario‚ Canada L3K5V7. Reach out for assistance with installation‚ troubleshooting‚ or purchasing replacement parts.