
Setting Up the Nurture Right 360 Incubator
Unbox and prepare the incubator by ensuring all components, including the egg turner and water pots, are included․ Place the incubator on a stable surface, away from drafts, and connect the egg turner and power supply․ Align the incubator top properly to ensure 360-degree visibility and secure closure․ Follow the manual for precise setup and initial power-up instructions․
- Unboxing: Check for all components like egg turner and water pots․
- Placement: Position on a stable, draft-free surface․
- Connection: Plug in the egg turner and power supply․
- Alignment: Ensure the incubator top is securely and properly aligned․
1․1 Unboxing and Initial Preparation
Start by carefully unboxing the Nurture Right 360 Incubator and verifying all components are included, such as the egg turner, water pots, and power supply․ Ensure the power cord is not missing, as it may be hidden under the incubator or at the bottom of the box․ Place the incubator on a stable, flat surface in a draft-free area․ Before first use, wash hands thoroughly and ensure the incubator is clean․ Remove any packaging materials and prepare the device for setup by aligning the base and top sections properly․ Follow the manual for initial preparation steps․
- Verify all components are included during unboxing․
- Ensure the incubator is placed on a stable, flat surface․
- Prepare the device by aligning the base and top sections․
1․2 Connecting the Egg Turner and Power Supply
Plug the egg turner cord from the base into the designated socket on the back of the incubator top․ Next, connect the power supply unit to the incubator top, ensuring it is securely attached․ Place the incubator top onto the base, making sure it aligns properly and the clear window is fully closed․ Double-check all connections to ensure they are secure and functioning correctly․ Power on the incubator to verify the egg turner and other features are operating as expected․ Proper connections are crucial for maintaining consistent temperature and humidity levels during incubation․
- Plug the egg turner cord into the designated socket․
- Connect the power supply unit to the incubator top․
- Align and secure the incubator top on the base․
- Verify all connections and test the incubator’s operation․
1․3 Placing the Incubator Top and Ensuring Proper Alignment
After connecting the egg turner and power supply, carefully place the incubator top onto the base․ Ensure the clear window is completely closed and the top aligns perfectly with the base․ Check for any notches or guides to confirm proper alignment․ Gently press down to secure the top in place, ensuring no gaps remain․ Proper alignment is essential for maintaining consistent temperature, humidity, and airflow․ Once aligned, verify that all features, such as visibility and airflow circulation, are functioning correctly․
- Align the incubator top with the base using guides or notches․
- Close the clear window completely for proper sealing․
- Press down gently to secure the top in place․
- Ensure no gaps remain for optimal performance․
Key Features of the Nurture Right 360 Incubator
The Nurture Right 360 Incubator features an automatic egg turner, precise temperature and humidity control, 360-degree visibility, and a built-in LED candler for optimal egg monitoring․
- Automatic egg turner for consistent egg rotation․
- Digital temperature and humidity controls․
- 360-degree clear visibility for easy monitoring․
- Built-in LED candler for egg development checks․
2․1 Automatic Egg Turner and Capacity
The automatic egg turner in the Nurture Right 360 Incubator ensures consistent egg rotation, promoting even development․ It accommodates up to 22 chicken eggs, with adjustable trays for various species․ The turner operates quietly and stops 3 days before hatching to allow chicks to position correctly․ This feature eliminates manual turning, reducing handling stress and increasing hatch rates․ The capacity is optimized for both beginners and experienced breeders, making it versatile for different egg quantities and types․ The turner’s design ensures minimal vibration, maintaining stable conditions for embryo growth․
- Capacity: Up to 22 chicken eggs․
- Adjustable: Suitable for ducks and pheasants․
- Automatic: Reduces manual intervention․
2․2 Temperature and Humidity Control Systems
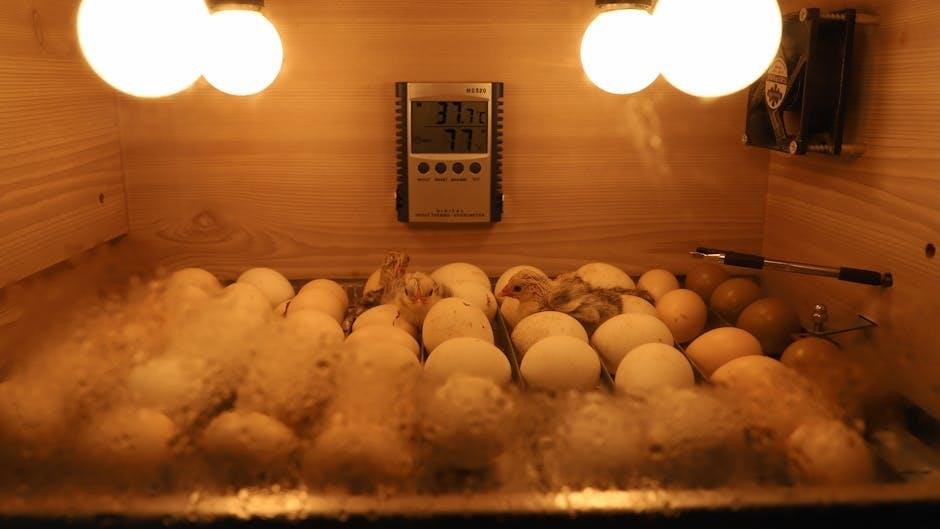
The Nurture Right 360 Incubator features precise temperature and humidity control systems, essential for optimal egg development․ The incubator is preset to 99․5°F for chicken eggs, with easy adjustments for other species․ Humidity levels are managed through a digital display and adjustable knob, ensuring accurate control throughout incubation․ The system maintains consistent conditions, crucial for embryo growth and hatch success․ Regular monitoring of these settings is recommended to ensure ideal incubation environments․
- Temperature preset: 99․5°F for chicken eggs․
- Humidity control: Digital display with adjustable knob․
- Consistency: Maintains stable conditions for development․

2․3 360-Degree Visibility and Airflow Circulation
The Nurture Right 360 Incubator offers exceptional visibility with its 360-degree transparent design, allowing continuous monitoring of eggs from any angle․ This feature ensures you can track development without disturbing the incubation environment․ Enhanced airflow circulation promotes even heat distribution, maintaining stable temperatures and humidity levels․ Proper ventilation is crucial for healthy embryo development and high hatch rates․ The clear window and optimized airflow system make it ideal for observing the incubation process while ensuring optimal conditions for successful hatching․

- Visibility: 360-degree transparent design for continuous monitoring․
- Airflow: Enhanced circulation ensures even heat and humidity distribution․
- Ventilation: Crucial for embryo health and high hatch success․

The Incubation Process

Place eggs, set the 21-day timer, and let the incubator maintain optimal temperature and humidity․ Automatic egg turning stops before hatching, ensuring ideal conditions․

- Egg placement: Gently arrange eggs in the tray․
- Timer setup: Preset to 21 days for chicken eggs․
- Conditions: Maintains 99․5F and humidity for embryo development․
3․1 Placing Eggs and Setting the Timer
Gently place the eggs in the incubator tray, ensuring they are stable and evenly spaced․ The incubator is preset to 99․5F for optimal development․ Plug in the unit, and the timer will automatically start a 21-day countdown for chicken eggs․ This preset ensures precise tracking of the incubation period, stopping the egg turner 3 days before hatching to allow chicks to position themselves correctly․ Monitor the countdown to ensure everything progresses smoothly․
- Eggs: Place gently in the incubator tray․
- Timer: Preset to 21 days for chicken eggs․
- Temperature: Maintains 99․5F for ideal conditions․
3․2 Monitoring Temperature, Humidity, and Ventilation
Regularly monitor the incubator’s temperature, ensuring it remains at 99․5°F for optimal egg development․ Humidity levels should be maintained at 30-40% during incubation and increased to 60-70% in the final 3 days․ Use the built-in water pots to regulate humidity by adding water as needed․ Proper ventilation is crucial; ensure the incubator’s airflow vents are unobstructed․ Check the water levels daily and adjust to maintain stable conditions․ Avoid opening the incubator excessively to prevent temperature fluctuations․ Use the LED candler to monitor egg development without disturbing the environment․
- Temperature: Maintain at 99․5°F for optimal development․
- Humidity: 30-40% during incubation, 60-70% pre-hatch․
- Ventilation: Ensure vents are clear for proper airflow․
3․4 Preparing for the Final Stages of Incubation
Three days before hatching, stop the egg turner and increase humidity to 60-70% by adding water to the water pots․ Ensure the incubator is sealed to maintain conditions․ Monitor for pipping and zipping without candling excessively․ Avoid opening the incubator to prevent disrupting the hatching process․ Proper ventilation is crucial to prevent carbon dioxide buildup․ Keep the incubator in a stable, quiet environment to support the chicks as they emerge․ Be prepared for variable hatching times and avoid interventions unless necessary․
- Stop the egg turner 3 days before hatching․
- Increase humidity to 60-70% for optimal hatching․
- Seal the incubator and monitor for pipping․

Maintenance and Troubleshooting
Regularly clean the incubator with a soft cloth and mild detergent․ Address issues like temperature fluctuations or humidity problems promptly․ Refer to the manual for troubleshooting guides and solutions to ensure optimal performance and hatch rates․
- Clean the incubator after each use․
- Check for blockages in air vents․
- Consult the manual for common fixes․
4․1 Cleaning and Sanitizing the Incubator
Regular cleaning and sanitizing are essential for maintaining a healthy environment for egg incubation․ After each use, disconnect the power and allow the incubator to cool․ Use a soft, damp cloth to wipe down surfaces, avoiding harsh chemicals․ Sanitize with a mild detergent solution, ensuring all areas are clean and dry before reuse․ Pay special attention to vents, trays, and the egg-turning mechanism to prevent bacterial growth․ Always refer to the manual for specific cleaning instructions to ensure optimal performance and hatch rates․
- Disconnect power and let the incubator cool․
- Use a soft cloth and mild detergent for cleaning․
- Sanitize all surfaces, focusing on vents and trays․
- Ensure the incubator is dry before reuse․
4․2 Addressing Common Issues During Incubation
During incubation, common issues may arise, such as temperature fluctuations or humidity imbalances․ Check the thermostat and ensure the incubator is placed in a stable environment․ If the egg turner stops, verify it is properly connected and aligned․ For humidity concerns, adjust water levels in the pots and monitor the display․ Power outages can disrupt settings, so consider using a backup power source․ If hatch rates are low, review incubation conditions and ensure proper egg turning․ Always refer to the manual for troubleshooting specific issues to maintain optimal incubation conditions․
- Check thermostat for temperature stability․
- Adjust water pots to maintain humidity levels․
- Ensure egg turner is connected and aligned․
- Use a backup power source during outages․

The Hatching Process
Common issues during incubation include temperature fluctuations, humidity imbalances, or the egg turner stopping․ Check the power supply and connections․ Ensure the incubator is on a level surface․ For temperature issues, verify the thermostat settings․ Adjust humidity by adding water to the pots․ If the egg turner stops, restart the incubator․ Monitor ventilation to ensure proper airflow․ Refer to the manual for troubleshooting specific error messages․ Addressing these issues promptly will help maintain optimal conditions for successful hatching․
- Check power supply and connections․
- Ensure incubator is level․
- Adjust thermostat and water levels․
- Monitor ventilation and airflow․

5․1 Stopping the Egg Turner and Adjusting Conditions
The egg turner automatically stops 3 days before hatching to allow chicks to position themselves for hatching․ Ensure the incubator is at 99․5°F and humidity levels are increased to 65-70%․ Remove the egg turner and place eggs directly on the incubator base․ Monitor the incubator’s conditions closely, as manual adjustments may be needed․ Avoid opening the incubator excessively to maintain internal conditions․ Proper alignment of the top ensures optimal airflow and visibility during this critical phase․
- Stop the egg turner 3 days before hatching․
- Adjust humidity to 65-70% for final stages․
- Remove the egg turner and place eggs on the base․
- Monitor temperature and humidity levels closely․
5․2 Monitoring the Hatching Phase
Diligently monitor the hatching phase to ensure optimal conditions․ Maintain humidity at 65-70% and temperature at 99․5°F․ Avoid opening the incubator excessively to prevent disrupting the process․ Observe eggs through the 360-degree visibility window for signs of pipping and zipping․ Once chicks start emerging, reduce heat to 99°F to prevent overheating․ Monitor for any issues, such as chicks sticking to shells, and intervene gently if necessary․ Post-hatch, ensure chicks are dry and active before moving them to a brooder․
- Maintain humidity at 65-70% and temperature at 99․5°F․
- Monitor eggs for pipping and zipping through the clear window․
- Reduce heat to 99°F after chicks begin hatching․
- Ensure chicks are dry and active before moving them․