
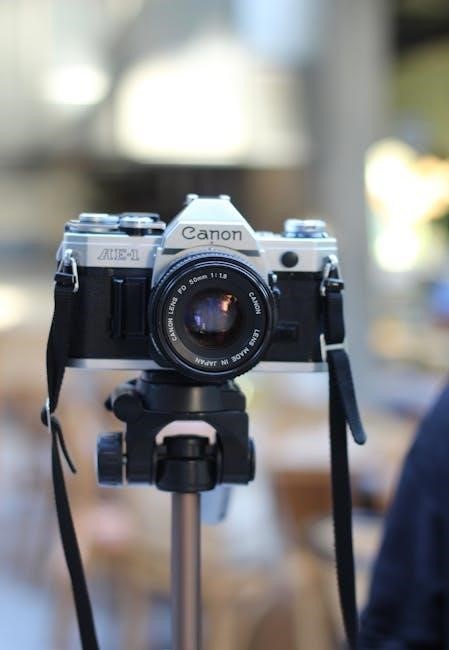
Welcome to the Canon AE-1 Program instruction manual‚ a comprehensive guide for mastering this iconic 35mm SLR film camera․ Released in 1981‚ the AE-1 Program offers advanced features like programmed AE‚ shutter-speed priority‚ and manual modes‚ making it a favorite among photographers․ This manual provides detailed instructions on operation‚ modes‚ and troubleshooting‚ ensuring optimal use of its capabilities․
1․1 Overview of the Canon AE-1 Program
The Canon AE-1 Program is a 35mm SLR film camera introduced in 1981‚ known for its advanced features and user-friendly design․ It offers three operation modes: Programmed AE‚ Shutter-Speed Priority‚ and Manual․ Designed for both amateurs and professionals‚ it features a built-in light meter‚ manual aperture control LED‚ and compatibility with Canon FD lenses․ The camera’s versatility and ease of use make it a popular choice for photographers seeking creative control and reliability․
1․2 Historical Significance and Popularity
The Canon AE-1 Program‚ introduced in 1981‚ became a landmark camera in photography history․ Its user-friendly design and advanced features made it a favorite among both amateur and professional photographers․ The AE-1 series‚ launched in 1976‚ revolutionized photography by making SLR technology accessible to a broader audience․ The AE-1 Program’s popularity endured due to its reliability‚ versatility‚ and compatibility with Canon’s FD lens system‚ solidifying its legacy as a timeless classic in film photography․
Specifications and Operation Modes
The Canon AE-1 Program‚ introduced in 1981‚ became a landmark camera in photography history․ Its user-friendly design and advanced features made it a favorite among both amateur and professional photographers․ The AE-1 series‚ launched in 1976‚ revolutionized photography by making SLR technology accessible to a broader audience․ The AE-1 Program’s popularity endured due to its reliability‚ versatility‚ and compatibility with Canon’s FD lens system‚ solidifying its legacy as a timeless classic in film photography․
2․1 Key Features of the Canon AE-1 Program
The Canon AE-1 Program is a 35mm SLR film camera featuring electronic control‚ three operation modes (Program AE‚ Shutter-Speed Priority‚ and Manual)‚ and compatibility with Canon FD lenses․ It includes a built-in light meter for accurate exposures‚ a self-timer‚ and manual aperture control LEDs in the viewfinder․ The camera supports automatic film advancement with the optional Power Winder‚ making it both versatile and user-friendly for photographers of all skill levels․
2․2 Operation Modes: Program‚ Shutter-Speed Priority‚ and Manual
The Canon AE-1 Program offers three operation modes․ Program AE automatically sets both shutter speed and aperture for optimal exposures․ Shutter-Speed Priority AE allows manual adjustment of shutter speed‚ with the camera controlling the aperture․ Manual mode provides full control over both settings․ Additionally‚ AE Flash Mode is available for flash photography‚ ensuring balanced exposures․ These modes cater to various shooting preferences and skill levels‚ enhancing creative flexibility and precision․
Design and Build Quality
The Canon AE-1 Program features a robust‚ ergonomic design with high-quality materials‚ ensuring durability and comfort․ Its compact‚ lightweight body is built for long-term reliability and ease of use․
3․1 Exterior and Interior Components
The Canon AE-1 Program features a robust exterior with a durable metal body and synthetic rubber coating for grip․ Key components include the shutter speed dial‚ mode selector‚ and ASA/Exposure compensation dial on the top; The bottom houses the battery compartment and tripod socket․ Internally‚ the camera boasts a reliable mirror mechanism and focal plane shutter‚ ensuring precise control and long-lasting performance for photographers․
3․2 Naming the Parts: Top View and Bottom View
The top view of the Canon AE-1 Program features the shutter speed dial‚ mode selector‚ and ASA/Exposure compensation dial․ The hot shoe is located on the right side for flash attachment․ On the bottom‚ the battery compartment and tripod socket are positioned for easy access․ These components are thoughtfully arranged to enhance usability and ensure intuitive operation during photography sessions․

Loading the Battery
Insert the battery into the compartment on the camera’s bottom‚ ensuring correct polarity․ Close the compartment securely and verify battery power using the provided button․
4․1 Inserting the Battery
Open the battery compartment on the camera’s bottom by sliding it open․ Insert a 6V silver-oxide battery (SR44 or equivalent) with the positive terminal facing upwards․ Close the compartment securely․ The battery powers the camera’s metering system and film advance․ Ensure correct polarity to avoid damage․ Avoid using a battery with a built-in dew sensor‚ as it may not fit․ Never modify the battery to force it into the compartment․
4․2 Checking Battery Power
Press the battery check button located on the camera’s bottom․ If the LED lights‚ the battery is sufficient․ A weak or dead battery will not illuminate the LED․ Perform this check before loading film to ensure proper camera operation․ Low battery power can cause inaccurate metering or film advance issues․ Replace the battery if the LED does not light or dims significantly․ This ensures reliable performance during shooting․
Operating the Camera
Master the Canon AE-1 Program by setting film speed‚ loading film‚ and using the power winder for smooth operation․ Explore its intuitive controls for precise photography․
5․1 Setting the Film Speed
Setting the film speed on the Canon AE-1 Program ensures proper exposure․ Locate the ISO dial‚ typically found on the top near the shutter speed dial․ Lift and turn the dial to match your film’s ISO rating‚ usually between 12-3200․ Accurate film speed setting is crucial for optimal exposure control․ This step must be completed before loading the film to ensure consistent results throughout your roll․
5․2 Loading the Film
To load film into the Canon AE-1 Program‚ open the camera back by pulling the release latch․ Align the film with the spool‚ ensuring the perforations match the guide․ Gently advance the film until it secures on the take-up spool․ Close the back and advance the film to the first frame using the rapid rewind knob or power winder․ The frame counter will confirm the film is loaded correctly․
5․3 Using the Power Winder
Attach the Power Winder to the camera’s base and ensure it is securely connected․ The winder allows automatic film advancement‚ enabling quick and convenient shooting․ After loading the film‚ use the winder to advance frames effortlessly․ The Power Winder simplifies operation‚ especially for sequential shots‚ and is powered by batteries․ Always check the frame counter to confirm proper advancement and ensure smooth functionality during use․

Shooting Modes
The Canon AE-1 Program offers three automatic exposure modes: Programmed AE‚ Shutter-Speed Priority AE‚ and Manual Override‚ plus AE Flash mode for versatility in photography․
6․1 Programmed AE Mode
In Programmed AE Mode‚ the camera automatically sets both shutter speed and aperture for optimal exposure․ Activate this mode by setting the diaphragm ring to “Auto” and the speed knob to “Program․” The AE-1 Program calculates the best exposure‚ offering convenience for beginners and professionals alike․ This mode is ideal for versatile shooting‚ allowing users to focus on composition while the camera handles technical settings efficiently․
6․2 Shutter-Speed Priority AE Mode
In Shutter-Speed Priority AE Mode‚ you set the desired shutter speed‚ and the camera automatically adjusts the aperture for proper exposure․ This mode is ideal for controlling motion effects‚ such as freezing fast-moving subjects or creating blur․ Simply select the shutter speed using the speed knob‚ and the AE-1 Program will calculate the corresponding aperture‚ ensuring precise control over your photography․
6․3 Manual Override
The Manual Override mode allows full control over both aperture and shutter speed‚ bypassing the automatic settings․ This mode is ideal for experienced photographers who want precise control over exposure․ Simply set the desired aperture using the lens aperture ring and the shutter speed with the speed knob․ The camera’s built-in metering system provides guidance through the viewfinder LEDs‚ ensuring accurate adjustments for optimal results in various lighting conditions․
6․4 AE Flash Mode
The AE Flash Mode automatically calculates flash exposure based on the aperture setting‚ ensuring balanced lighting; Activate this mode by turning the mode dial to the flash symbol․ Set the aperture ring to the desired value‚ and the camera will automatically adjust the shutter speed․ Ideal for low-light conditions‚ this mode provides precise control over flash illumination․ Use it for indoor portraits or backlit scenes for professional results‚ and refer to the troubleshooting section for any issues․
Viewfinder and Metering System
The Canon AE-1 Program features a built-in light meter and manual aperture control LED in the viewfinder‚ providing precise exposure control and visual feedback for optimal results․
7․1 Built-In Light Meter
The Canon AE-1 Program features a highly accurate built-in light meter‚ essential for precise exposure control․ It provides visual feedback through LEDs in the viewfinder‚ indicating whether the exposure is under‚ over‚ or correctly set․ This system works seamlessly with FD lenses‚ ensuring compatibility and optimal performance․ The meter is central to the camera’s functionality‚ aiding photographers in achieving perfect exposures in various lighting conditions․
7․2 Manual Aperture Control LED
The Manual Aperture Control LED‚ visible in the viewfinder‚ aids precise exposure adjustments in manual mode․ It displays a plus‚ minus‚ or correct exposure symbol‚ guiding aperture settings․ This feature ensures accurate control‚ especially when using FD lenses‚ enhancing your ability to achieve the desired exposure in various lighting scenarios․

Advanced Features
The Canon AE-1 Program offers advanced features to enhance your photography experience‚ including self-timer‚ manual flash‚ and shooting with infrared film‚ providing precise control and versatility for professionals and enthusiasts alike․
8․1 Self-Timer
The self-timer on the Canon AE-1 Program allows for a 10-second delay before triggering the shutter‚ minimizing camera shake․ To activate‚ press the self-timer button on the front․ The LED in the viewfinder blinks during the countdown․ This feature is ideal for group photos or low-light shots without a remote‚ ensuring sharp images every time with consistent timing and reliability․
8․2 Manual Flash
The Canon AE-1 Program supports manual flash synchronization‚ allowing precise control over lighting․ The flash sync speed is set at 1/60 sec․ For optimal results‚ use Canon’s dedicated flash units like the Speedlite․ Set the flash intensity manually based on the scene’s lighting conditions․ Ensure the flash is positioned correctly to avoid direct eye exposure and reflections on the lens for clear‚ professional-quality images․
8․3 Shooting with Infrared Film
Shooting with infrared film on the Canon AE-1 Program requires specific techniques․ Use an R72 infrared filter and set the lens aperture to f/5․6 or smaller․ The camera’s built-in light meter may not accurately measure infrared light‚ so adjust exposures manually․ Increase exposure by +1 to +2 stops for optimal results․ For best effects‚ shoot under bright sunlight to enhance infrared reflection․ Always consult the manual for detailed settings and ensure proper filter usage for desired effects․
Troubleshooting
Common issues include battery depletion‚ shutter release problems‚ and film advancement errors․ Check battery power‚ ensure proper film loading‚ and clean the camera regularly․ Refer to the manual for detailed solutions and maintenance tips to resolve issues effectively․
9․1 Common Issues and Solutions
Common issues with the Canon AE-1 Program include low battery power‚ shutter release malfunction‚ and film advancement problems․ Solutions involve replacing or charging the battery‚ ensuring proper film loading‚ and cleaning the camera’s internal mechanisms․ If the shutter fails to release‚ check the battery and ensure the camera is in manual mode․ For film advancement issues‚ re-load the film correctly and ensure the film leader is properly aligned․ Regular maintenance and cleaning can prevent many of these problems․
9․2 Maintenance Tips
Regular maintenance ensures the Canon AE-1 Program operates smoothly․ Clean the lens and viewfinder with a soft cloth to prevent dust buildup․ Check the battery level regularly and replace it when necessary․ Store the camera in a dry‚ cool place to avoid moisture damage․ Use a clean‚ dry cloth to wipe down exterior surfaces․ Avoid exposing the camera to harsh chemicals or extreme temperatures․ Proper care extends the camera’s lifespan and ensures reliable performance․